Sunday, March 27, 2011

March Workdays ~ "GalaxIng" Moments in Early Spring

I have always enjoyed the rich earthy green
of the galax foliage

And the rich earthy red of galax foliage

 And somewhere in between one might notice the
red/green/burgundy/verde all in the same patch
 The tenderest and smallest of leaves
begins a brilliant red with soft and rounded edges
FRESH TRAIL ALERT!!!

Our Watauga County Task force under the leadership of John Lanman  
 And our Ashe County Task Force friends under the leadership of Jim Hallsey
 Have been cutting fresh trail for the next section to be opened on the Watauga Mountains to Sea Trail.
 And that sure was a happy thing to discover on my recent walk about.
 In early spring, after the thawing,
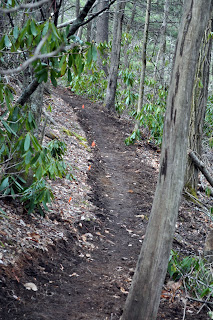
the trail lays fresh and smells like winter earth warming.
 This sweet curve was cut by our volunteers last weekend.
John says: 
We had 8 workers a week ago and 9 last Saturday. 
We did 400-450 feet of trail each day.  
 
HUGE THANKS
for your good work goes out to:
John Lanman, Jim Hallsey, Marieta Warnstedt, Bruce Wisely,
Wylie Berry, Bob West, Gloria Marquez,
Keith Roberts, Gerry Staninger, Michael Franklin,
Steven Mierisch, Don Bergey.

 The winter always drops the most fascinating lichens and mosses from high up in the trees.
 I have never learned what to call these formations.
 But this one I shall call "Dragonhead filamentus".
 And thus arrives the end of the trail work for this posting. Isn't it interesting to look ahead and see where the work day ended and the next work will begin ~ ~ ~

In the next four photos notice the difference in three years of work. All of these shots are within a few thousand feet of each other on the same section of trail.

I like how the trail naturalizes over time. 
 Above is our most recent cut, barely two weeks old
 Above is the work done in the fall of last year
 This obstacle was avoided by the crew last fall.
This section was developed two years ago during the fall by volunteers and work crew

And this section was develpoped three years ago during the First Big Dig.
To all of our volunteers who work to open new MST trail
I offer the warmth of this heart.
HOW GALAXING!

Sunday, March 6, 2011

How to Plant a Post ~ Our Trail Markers are Ready to be Installed

So how does a trail marker get planted?
 This simple looking trail post is not so simply planted.
 These are the tools you will need to install a trail marker in these mountains. A rake, a measured post hole digger, a pike, a shovel, a hammer, spikes, loppers, post level, and gloves.
The pike is the most underrated tool used in the process of digging a hole. The digging end cuts the earth, roots, and dislodges stone.
The bull head end is used for tamping and compacting the earth around the post.
Once you know exactly where to put the post rake back the surface duff and vegetation. Use the pike to explore the area to determine where there is rock or roots your might have to work around.
If you try to dig only with a post hole digger you will wear yourself out. Use the pike to bust up the dirt six or more inches at a time and then use the post hole diggers to remove the loosened dirt.
There will be roots that the pike or the diggers will not remove. This is when the loppers come in handy to snip them out of the hole.
At this point the hole is round and nearly the correct depth of 2 feet.

The posts are 4 feet in length. The goal is to bury them 2 feet deep. Now check the depth and measure for accuracy.
Now insert the post in the hole before you hammer in the spikes. The importance of this step is to determine the face direction of the post. The post should be installed to face in the direction the hiker approaches the sign post.   Once the direction is aligned make sure the white directional arrows are still accurate.  The notch the edges in the hole so the post will sit properly in the direction it needs to face.
After this step you will remove the post from the hole to hammer in the spikes. But, do not do this until you have done this step.  While the post is in the hole, begin to notch out the path for the spikes to slide into. (The 10 inch spikes will be on opposite sides of the post sticking out about 6 inches).
The spikes are set in the post at 12 inches from the bottom, so that is the depth you must clear into the hole to install the post with spikes.
The galvanized steel spikes are hammered into the post at 12 inches.
They should be left sticking out about 6 inches on opposite sides.
And why? you might ask are there spikes in the post. Well it stablizes it to some degree, but mostly, it makes it much more difficult for some prankster to pull up the trail marker on a dare or for a souvenier.
The post with spikes is now re-installed in the hole and left loosely standing. Before tamping in place make sure the face of the marker is still turned in the direction you want it to be.
The next tool needed is the post level. It is strapped onto the top of the post. The bubble indicators help correct the plumb of the post helping to install it truly vertical.
True vertical is especially difficult on sloped mountain locations with rock or roots.
This bubble is true, this post is vertical and plumb. Let the tamping begin.
Use the tamping end of the pike to compact the dirt above the spikes. Back fill with the shovel until all the dirt is re-compressed into the voids. It is helpful to have a second person at this time to keep an eye on the level and hold the post true while you tamp.
The job is nearly finished and all the tools are ready to return.
So there you have it, remember to take all the tools you'll need for the work of planting a post.
Hikers will be able to see from two sides of the post which directions the trail heads. This post did not get placed correctly, the face of the post should be turne about 30 degrees clockwise. My bad~
Same post in this photo as seen from the opposite side.
When the job is done correctly, perhaps you will earn the placement of the MST Hiker Icon.

Ironically, often the "Hiker" is heading in the opposite direction of the arrow.
Go figure ~ ;-)