Sunday, June 30, 2013

High Shoals Bridge Part 4 ~ Wings Formed, Poured, Back Filled, and Stoned

In previous postings, Parts 1-3 I presented the beginning stages of construction. To follow the sequence begin here:
The wing forms have been built and added to the abutments.
 This view illustrates the construction of re bar steel grid that adds strength to the concrete.
 This view illustrates the wing form attached to the abutment
 The footplate on the abutment is where the 50 foot bridge beams will be attached
 These bolts were cast into the concrete of the abutment.
 The falls above the bridge continue to inspire me and I do believe this will be a classic photo point along the MST in Watauga. Hopefully, the Friends of Watauga MST will be able to maintain and enhance this location for the enjoyment and appreciation of all hikers.
 On this day it is evident how necessary a bridge is for crossing at this point along the MST. After an afternoon rain storm the water rushes to a depth of danger that makes it precarious to cross High Shoals Creek. This workers footbridge was quickly lifted and washed into the creek. 
 The photographer was not able to cross this day but you can see that the east side the wings have been completed in this shot. 
 Next work begins on the surface treatment of the exposed portion of the abutment.
 Native stone is glued to the form and held in place until set.
 Building upon each step the stone is put in place.
Finished surface stone work awaits final grouting.


 The drain pipe is for back seepage to allow water to drain from behind the abutment. 
 Now the process of back filling behind the abutment begins.
 Gravel is hauled by wheelbarrow and a base layer is filled to the drain pipe.
Corrugated and perforated drainpipe is put in place and attached to the spout.
After many loads of gravel, the trail is brought up to grade level.
Our contractor, Larry Hampton,  was always on site and always keeping busy making progress on our project. Our Task Force director, John Lanman, had the highest of praise for the good work Mr. Hampton had done on this job. Thanks!

Sunday, June 9, 2013

A Pouring to Share ~ High Shoals Bridge Construction ~ Part 3

In the first two posts we examined how the footers were dug, saw the first pouring of concrete for the footers, and the construction of wooden forms for casting the above ground concrete abutments were built.
 
Today, we will follow the process of filling the forms with concrete. One might ponder how do you get concrete from the BRP down to the river?
 
Here is what took place on a foggy, chilly, day in June....
Volunteers controlled the traffic flow along the parkway insuring no accidents while the trucks were along the roadside. 
Here Margaret Lanman performs traffic safety, flag in one and walkie talkie in the other. Thanks for stepping up Margaret!
Larry Hampton holds post on the opposite end of the section where we are working.
 How nice to receive a nod of approval from our supportive and helpful BRP rangers.

This Loven concrete truck arrived shortly and positioned in place just above the concrete pumper. 
 The pumper is connected to a hose that is run from the roadside pumper to the creekside below.
 All concrete flows contained within this thick flexible 6 inch hose pipe. Note how it is supported above the river to be safe regarding contamination.
 From the business end of the concrete truck
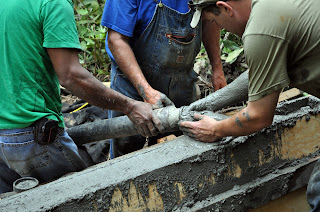
 to the end of the hose below the concrete doth flow.
 Here you can see the construction crew feeding the concrete behind the rebar in the open form.
 As the call to stop pumping goes out to the crew up on the roadside, the last bit of concrete is massaged out with gravity assist.
 The crew finishes off the top, leveling and grooming for the next stage.
 Now positioned on the west side of the creek the crew begins to ready for filling the form.
From the top and below two men guide the concrete hose into the form.  
Think about how heavy that hose filled with concrete must be.

This is what it looks like inside of the forms. Notice the drain pipe in place for flood stage drainage.
This rebar is drilled and set into the footer and then gridded for stability when cast in concrete.
The form is nearly filled. 
The crew completes the pouring of the form before capping the top with the J bar (see part 2). We are so happy to have such a focused and attentive contractor. His men and his machines are getting the job done correctly with as little impact on the environment as possible. Thanks!
High Shoals Bridge Construction Part 2

In Part 1 we looked the location for the bridge to cross High Shoals Creek. These next two photos show the beauty of the falls just above (south) of the bridge.
 This is a beautiful waterfall that will be visible from the center of the bridge when completed. Watauga Task Force and MST volunteers spent a day clearing debris and downfalls from the river in this location in 2012.
This is the beauty revealed for their efforts. I am sure many memorable photos will be taken from this bridge for many years to come. 
 The rebar is set in the footer and completely cured. A wooden form must be constructed for casting the concrete on the footer.
 The hole in the center is a drainage that will run through the abutment to allow for flood stage build up to drain through the concrete form.
 This is the wooden casting form unfilled.
 Concrete will be pumped into the form from above. The J bars attached to the top will be set down into the wet concrete.
 They will then be anchored in the concrete, the bolts undone from the form, and then they will be the connection for the cross beams.
 Looking back across the river to the west side one can get a good estimate of the length of the bridge span!
 The black felt is a soft but very thick cloth that covers the exposed dirt during construction.
 This felt helps insure the bank stays drier, the workers have good footing, and reduces the potential for soil erosion into the creek.
 The form for the west side from the trail view is about 5 feet high from the footer.
This is a climbing fern colony that has settled in the top of an old tree snag about 10 feet above the ground and within one foot adjacent to the construction site. I have been very impressed with the caution and care Larry Hampton and his crew have taken to insure the least impact on the environment. They are clean, efficient, thoughtful, and considerate of the natural habitat. This fern is my watchdog. If it stays without damage through the construction project I will be mightily impressed.